Friday, December 20, 2013

In a galaxy far far away....

I'm sorry all of my posts have been so sporadic, I feel stymied on my quilt and I'm so close to finishing I just needed to walk away from it a bit because I felt it was becoming quite the obsession that I needed some perspective. I still have about 8 more quilt squares to complete until I am ready for final assembly. I have also been job hunting like a fiend and that has taken up the greater part of my time of late. However, I was doing a little embroidery today and thought it would be a good time to update my blog. After this post though, I think the only fandoms I have remaining are The Chronicles of Narnia, Battlestar Galactica, Sherlock and Star Gate. I also have yet to find a place to get a custom piece made for middle square.

But I digress, lets talk Star Wars. What would my nerdy quilt be without Star Wars? This particular franchise has the most quilt squares because it is so incredibly epic. George Lucas revolutionized science fiction and the world of special effects when Star Wars first came out in the late 1970s. To this day, it is completely relevant and does not seem hokey at all. This is the most epic battle of good versus evil, the rebel alliance versus the empire. So many political and social parallels can be drawn from the world of star wars. My quilt squares are a mix of just fabric, applique and embroidery. So without further ado:
The first two are just some nifty fabric I found at JoAnn's.

Fabric applique of the Millenium Falcon:

I thought about filling in the details of the droids but that would have been incredibly labor intensive plus I was not confident in my own skills:

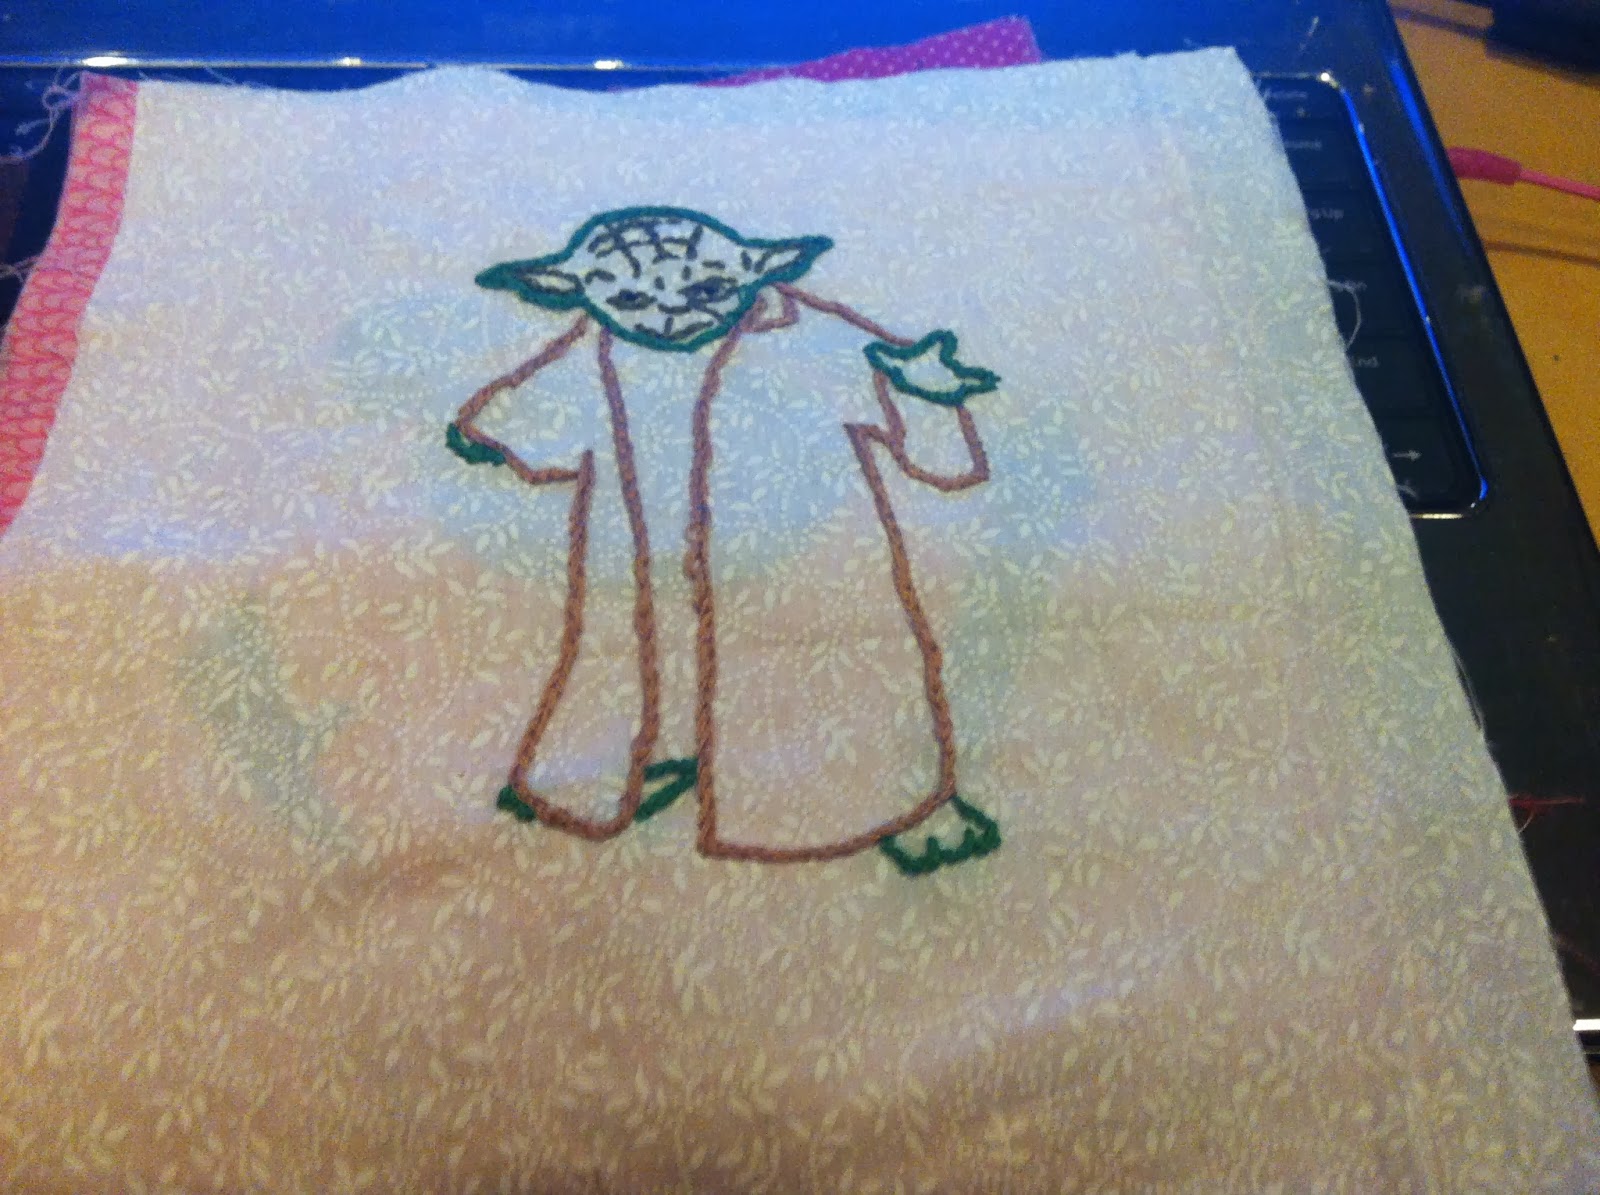
I love how Yoda turned out! I was going to fill him in with a nice satin stitch but I thought he looked nice against the white fabric, plus satin stitching uses up an insane amount of thread:

This is my fabric applique Ewok, cutified. 

And my fabric applique wookie that is also cutified:

A light saber, and I found this DMC metallic type green embroidery floss. They make a glow in the dark floss that would have been awesome but they didn't have it in store and I didn't feel like ordering it online:

Storm Trooper:

Of course, Vader had to be a part:

And there you have it. My Star Wars quilt squares. 

I would like to take a moment to discuss how incredibly upset I am that J.J. Abrams has teamed up with Disney for the next installments of Star Wars. Come on Lucas! What is going on? This is going to be an abysmally disappointing disaster. We might as well make Patton Oswalts dream come true: 


Next Post: The final pieces! (As there are only a few dedicated to each of my remaining fandoms, once I finish them I will make one final post with my remaining quilt squares before I reveal the final product!) 


Sunday, November 17, 2013

To Infinity and....Oh wait....wrong movie!

Alright folks, it's been a while since I've posted anything but it's time to show my Star Trek quilt blocks. I really like how these turned out! And as I write this I am approaching the finish line, I have about 8 more blocks to make before it's ready for assembly! So getting excited!! But without further ado:
I know I know I went with a "keep calm" very cliche but oh well! 
I love how this one turned out! The circle is a good example of a seed stitch, the words are a split stitch and the insignia is a satin stitch. 
The obligatory live long and prosper:
And finally, I couldn't resist this fabric: 
Also JJ Abrams ruined Star Trek! Sorry everyone, if you only like the new Trek, go back and watch the original Wrath of Khan and possibly some TNG! That's Star Trek!!

Next Post: Star Wars is finally complete!! 

Monday, November 11, 2013

Lord of the Rings

When epic battles of good versus evil come to mind, I think of Star Wars and Lord of the Rings. Lord of the Rings is one of my all time favorite epics. From reading the books as a kid to watching the movies as an adult, I am constantly thrilled and delighted and the story never gets old. So how fitting it is to include Lord of the Rings into my Epic Quilt of Nerddom!

Once again, there are so many themes from Lord of the Rings that I could have chosen from. I scoured the internet for inspiration and found many people more creative and talented than I. Many things that I found were cross stitched, which isn't my strong suit, as I haven't practiced much cross-stitch or counted cross stitch and I don't really have the materials necessary to cross stitch. Although, I did stumble across some pretty cool cross-stitching software where you can upload pictures, designs, or drawings, and it will make a cross-stitch grid pattern for you. I have noticed that some of that software is costly but I did see some decent free ones as well.

However, as I did not want to do any cross-stitching, I settled on drawing out my own designs to embroider. I chose:

  • The One Ring (Obviously) - I still need to finish the word "all" because at the time I had ran out of black embroidery floss. 

  • The Evenstar (I'm not sure I like how it turned it out, but it's recognizable and my quilt is going to be a little quirky anyway, so it's fine with me)

  • A dragon that is suppposed to represent Smaug. (I love how it turned it!). Speaking of Smaug, Benedict Cumberbatch is doing the voice of Smaug in the new Hobbit movie! I'm so excited! My dream in life is to move to England, quilt all day in a cabin in the countryside, meet Benedict Cumberbatch, make him fall in love with me and then have his babies. I know it won't happen but a girl can dream! This dragon is a great example of several different stitches. The wings and eye are french knots, the head is split stitched, and the body is satin stitched. 
  • A leaf of Lorien, with the saying "not idly do the leaves of lorien fall". Although I'm concerned my leaf of Lorien looks more like a jalepeno than a leaf of Lorien, but such is life. What do you, my many readers, think? (She says facetiously). 
  • Finally, the sword of Elendil that was reforged and given to Aragorn by Elrond, with the saying "renewed shall be the blade that was broken):


Check out the new Hobbit trailer:

 Next Post: "Our Mission: to explore strange new worlds, to seek out new life and new civilizations, and to be boldly go where no man has gone before". Of course....STAR TREK!!!

Saturday, November 9, 2013

Fabric Applique/Superhero designs.

Fabric Applique is a great way to embellish your quilt and is much quicker than embroidering and I'm sure when it comes time to actually do the quilting when it is all assembled, it will be easier to quilt through applique than hand embroidery.

Applique comes from the French Appliquer, meaning "to put on" which has origins in the Latin applicare.

So all applique is is the process of fusing a cut out fabric pattern to your larger fabric for your quilt. If you look up ways to do fabric applique, you will find a lot of different things. A lot of people advise, drawing the reverse image on the back of your fusible adhesive then attaching it to the wrong side of your fabric then cutting it out and flipping it over and you have the right shape you wanted. I found this to be an extra un-needed step. In order to do this, you must find or draw your image. Either use a light source to trace the reverse image or scan it into your computer and use software to make the mirror image then either print it out or trace it. I don' t have the time or the patience for all of that.

I simply find the image I am looking for either draw it or print it out. Once I have my image, I tape it to the front (or right side) of my fabric, then I cut out the size of fusible paper I need and stick it to the back of my fabric (DO NOT PEEL THE PAPER OFF YET!). Then I cut out the entire thing, either with scissors, if it is a simple design, or with an exact-o knife or fabric/rotary cutters if it is a more intricate design. I use Pellon brand EZ-steam fusible paper, like the one found below:
http://www.joann.com/ez-steam/2962462.html#prefn1=isProject&start=36&q=pellon&sz=18&prefv1=false

Once your design is cut out, remove the tape and the paper from the top and you should be left with your cut out fabric and the attached adhesive on the back. Next thing you do is remove the backing from the adhesive and place it where you would like it to be on your fabric square. Then simply follow the instructions of your adhesive to adhere it to your fabric with an iron. Usually, it requires you to take a damp cloth and place it over what you are ironing and then iron it to your fabric square. Then voila! You have just done fabric applique.


These are my 6 superhero themed quilt squares. I went with X-Men, Superman, Batman, Spiderman, The Avengers, and Captain America. Speaking of X-Men, check out the trailer for the new X-Men movie. It looks pretty sweet!:


You can applique things on top of each other. The Captain America symbol for example is the small blue circle appliqued onto the larger red, onto the larger white, onto the largest red with the star appliqued in the middle and then the entire thing is appliqued onto my quilt square. I like using a nice blanket stitch around the border of my applique to make it pop a little more. Here is a good instructional video that I watched to get down the practice of blanket stitching:


Next Post: Lord of the Rings!

Doctor Who!

After I completed my Harry Potter quilt squares, I decided to start on my Doctor Who ones. Oh, Doctor Who, how I love you! What to use? There were some obvious choices, of course. The Tardis, a Dalek, a Cyberman, a Sonic Screwdriver....but what else? I decided to go with an embroidered "wibbly wobbly timey wimey" which comes from one of my favorite Doctor Who episodes, from the David Tennant era entitled: "Blink". I believe this is the first episode of the "new Who" where we see the weeping angels for the first time and young Sally Sparrow must figure out how to get the Doctor out from 1969. The clip which this famous quote comes from is below:


If any of you have been living under a rock and don't know what Doctor Who is, or you have heard of it and have never watched it, check out this comedic Fine Brothers video describing 50 years of Doctor Who in the amount of time it would take you to make up your mind to stay in all weekend and watch Doctor Who to see what you have been missing!


But I digress: back to my awesome Doctor Who quilting squares, I ended up settling on a total of 7:
 The cyberman and the bowtie were my first attempts at fabric applique. My next post will be to address the way I found the easiest to do fabric applique.


 The Dalek, has both split stitching and french knots for the circles. I think I'm progressing nicely!

 I need to finish the blanket stitching around my tardis, but this was another fabric applique.
Finally, my sonic screwdriver is a nice example of how satin stitching can really make things pop, however, be aware of the amount of thread necessary to do this. The embroidery floss used was the DMC light effects embroidery floss. This floss is a little pricier (about 2.50 per skein, as opposed to the average .40-1.00 per skein) it is also a little more difficult to work with as it's not cotton and tends to tangle easier.

Next Post: Fabric applique!

Wednesday, November 6, 2013

Harry Potter!

After I mastered some of the basic stitches, I was able to get more creative with my embroidery. First up I decided to make all of my Harry Potter squares. This was a tough decision since there are so many things from Harry Potter that could be utilized. I scoured the internet as well for ideas.

(It might be important to add that this quilt is being made by me, for me. It is not intended to be sold or reproduced. I do not own copyrights to any images/themes from any franchise. Any reproduction of these themes/designs should be for personal use only. I do not know the legal repercussions of reproducing and selling hand made items with copyrighted themes).

I settled on my first 9 patches to be from Harry Potter, you have already seen my first three attempts at embroidery: The owl, the hallows, and the lightning bolt (again I haven't decided if i'm keeping them or not). Since I had a little more knowledge I decided to go big or go home for my fourth patch and I am glad I did because the result was fantastic:

I love how the Hogwarts crest turned out and this is by far the most detailed patch I have made to date and probably took me the longest to do (almost a week, if I remember correctly). The best way that I have found if you have a custom pattern, is to either draw it or print it out, pin it to your fabric once its in your embroidery hoop. Embroider through both the paper and the fabric and once you are done the stitching perforates the paper. Using tweezers, carefully and gently remove the excess paper when done.

My other Harry Potter squares are as follows:


This last one is not done. It represents Snape's patronus as a doe and the question "after all this time? always"

Can I take a moment to nerd out about Harry Potter?

I never liked Snape throughout the entire series, but at the end....wow J.K. way to throw another tear jerking moment in there. And for all those that may be reading this blog that have never read Harry Potter....WHAT ARE YOU WAITING FOR??? Do it now! Stop reading my blog and run, not walk, to your nearest book store, library, or cool friend who has all the books for you to borrow! Call off work and read Harry Potter! That's how awesome Harry Potter is....it's worth calling off of work for (which I have done more than once when the movies came out and of course I had to see them at midnight)!

Next Post: Doctor Who Magic!

Tuesday, November 5, 2013

Basic Embroidery Stitches

After I created my first 3 quilting patches, I decided to do a little research on different stitching techniques. I found a wonderful channel on youtube:
Wendi Gratz of Shiny Happy World.
http://www.youtube.com/channel/UCcgCYJApQD4fImpmjYViORA

Through her videos I discovered the world of running stitches, chain stitches, stem stitches, split stitches, satin stitches, blanket stitches, back stitches and french knots. I am going to discuss the stitches I like the best and why.

1.)  The running stitch: This is a basic outline stitch that when done gives a dotted line type look. I personally don't care for this stitch because I think it makes your design look disjointed. It is a good starter stitch to use and practice with to get used to embroidery.


2.) The split stitch: This is my absolute favorite outline stitch. It gives your design a nice braided effect and looks more continuous, this can be seen in my broomstick.

3.) The stem stitch: I like this stitch for doing curves or circles.

4.) The French knot: The french knot is perfect for animal fur and other detailing. I also like using it to dot my "i's". This effect can be seen below, my first french knot attempt when I made my snitch and broomstick:
5.) Satin stitch: The satin stitch is nice for filling in outlined designs. The problem with the satin stitch is that it takes up a lot of thread because you are essentially back stitching your entire design. But it gives your outline a little extra oomph  when filling stuff in.

6.)Back stitch: I like the back stitch for doing words and letters. It has a different texture and still has that cohesive line. Your stitching won't look disjointed like with the running stitch.

7.) Blanket stitches: I only use these to outline my fabric applique (which I will get to later)

For detailed instructions on how to use the various stitches, I highly recommend checking out Wendi Gratz's Youtube channel. There are also other several other videos and tutorials out there for you to check out.

Next Post: Putting together what I have learned so far.